Cyberpunk 2077 Beginner Guide — Essential Tips for New Players
Complete beginner guide: character creation, lifepath comparison, district unlock order, attributes overview, combat basics, cyberware capacity, money management, and 10 essential tips to survive Night City.
Published September 1, 2026 · Last updated September 4, 2026
Quick Answer: Essential Beginner Tips
Cyberpunk 2077 is a deep RPG with many systems. This guide covers the most important things new players need to know to survive and thrive in Night City. Key points: choose your lifepath wisely, visit Viktor Vektor early for free cyberware, sell junk regularly at drop points, unlock Fast Travel dataterms as you explore, complete The Heist around level 8-10 to open up the city, visit a Ripperdoc at level 10 for major upgrades, and save often — dialogue choices have real consequences. Do not rush Phantom Liberty — finish base-game content first.
| Tip # | What to Do | Why It Matters |
|---|---|---|
| 1 | Choose a Lifepath that fits your roleplay | Nomad/Streetkid/Corpo each give unique dialogue, a unique quest, and different first impressions |
| 2 | Visit Viktor Vektor after the prologue | Free cyberware: Kiroshi Optics + a hand implant. Huge early-game boost. |
| 3 | Sell junk regularly at drop points | Earn eddies and clear inventory clutter. Vendors are everywhere. |
| 4 | Unlock Fast Travel dataterms as you explore | Save enormous travel time later. 150+ across the map. |
| 5 | Complete The Heist around level 8-10 | Opens up the rest of Night City. Act 1 ends, Act 2 begins. |
| 6 | Visit a Ripperdoc at level 10 | Unlocks upgraded operating systems — a massive power spike. |
| 7 | Save often, especially before dialogue choices | Choices are irreversible. Many affect endings and questlines. |
| 8 | Do NOT rush [Phantom Liberty](/phantom-liberty) | Finish base-game content first. Recommended level: 15-20+. |
Character Creation & Lifepath
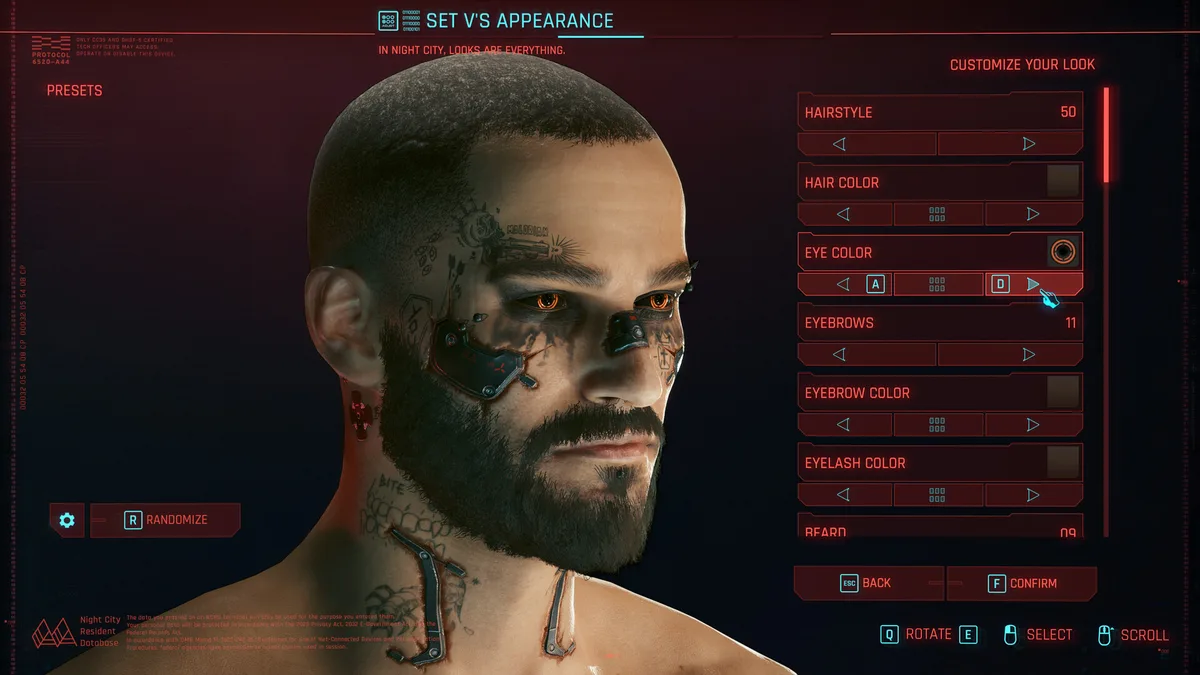
The character creator lets you customize V's appearance, voice and background. The most important choice is your Lifepath — it determines your prologue, some dialogue options, and a unique early quest.
| Lifepath | Starting Location | Theme | Best For |
|---|---|---|---|
| Nomad | Badlands (desert outskirts) | Outsider, freedom, survival | Exploration, vehicle play, grounded perspective |
| Streetkid | Watson (slums) | Street-level connections, gangs | Urban role-playing, street knowledge dialogue |
| Corpo | Corporate world (Arasaka Tower) | Intrigue, corporate espionage | Political dialogue, unique perspective on Night City |
Night City Districts & Exploration
Night City is divided into districts that unlock progressively as you advance the main story. Early game is restricted mainly to Watson.
| District | Unlock Timing | Danger Level | Key Features |
|---|---|---|---|
| Watson | From the start | Low-Medium | V's home district. Megabuilding H10, Afterlife, Little China. |
| Westbrook | After The Heist (Act 2) | Medium | Nightlife, Japantown, luxury. Tyger Claws territory. |
| Heywood | After The Heist (Act 2) | Medium | Residential, City Hall. Valentinos territory. |
| City Center | After The Heist (Act 2) | Low | Corporate heart. Skyscrapers, minimal street gangs. |
| Santo Domingo | After The Heist (Act 2) | Medium | Industrial. 6th Street territory. Power plants. |
| Pacifica | After Voodoo Boys arc | High | Abandoned resort. Voodoo Boys, Animals. Contains Dogtown (PL). |
| Badlands | After The Heist (Act 2) | Medium-High | Desert outskirts. Aldecaldos, Wraiths. Nomad territory. |
Attributes & Build Basics
After 2.0, there are five Attributes. You start with minimum 3 in each + 7 points to distribute. At max level 60, you can comfortably max three Attributes.
| Attribute | Governs | Best For |
|---|---|---|
| Body | Health, stamina, melee (Gorilla Arms), shotguns, forcing doors | Tank builds, close combat, survivability |
| Reflexes | Evasion, crit chance, blades, handguns, assault rifles, Mantis Blades | Samurai/Blades, Gunslinger, mobility |
| Technical Ability | Cyberware capacity, crafting, tech weapons, armor | EVERY build needs this — determines cyberware capacity |
| Intelligence | Cyberdeck RAM, Quickhacks, Breach Protocol, smart weapons | Netrunner builds, hacking |
| Cool | Crit damage, stealth, status resistance, Monowire, pistols | Stealth builds, headshot specialists |
Combat, Cyberware & Hacking Basics
Cyberpunk 2077 offers multiple combat approaches. You do not need to commit to one playstyle — experiment early and respec later.
| System | Key Points |
|---|---|
| Weapons | Three types: Power (ricochet), Tech (pierce cover), Smart (homing, requires Smart Link). Choose based on your build. |
| Cyberware | Installed at Ripperdocs. Categories: OS (Sandevistan/Berserk/Cyberdeck), Arms, Skeleton, Nervous System, etc. Capacity is limited by Technical Ability. |
| Quickhacks | Upload hacks via Cyberdeck. Contagion spreads to groups. Ping sees through walls. Great for stealth/crowd control. |
| Stealth | Cool attribute + Optical Camo cyberware. Silenced weapons. Crouch to reduce detection. |
| Melee | Blades (Reflexes) or Blunt/Gorilla Arms (Body). Pairs extremely well with Sandevistan time-slow. |
| Respec | Perks refundable freely outside combat. Attributes have limited respec. Experiment without fear. |
Money, Crafting & Progression
How to manage your resources and progress efficiently through the game.
- Sell weapons and junk at drop points regularly — earn easy eddies and clear inventory clutter.
- The Fenrir SMG is an excellent beginner weapon — look for it early in the game.
- Save often and keep multiple save files. Dialogue choices are irreversible and affect endings.
- Complete side content BEFORE the Point of No Return (Nocturne Op55N1) — the elevator to Embers locks out everything unfinished until the credits roll.
- Start Phantom Liberty after reaching Pacifica in the base game (recommended level 15-20+). Do not rush it.
Perks & Skill Trees Explained
Attributes are the skeleton of your build; perks are the muscle. Every level gives 1 perk point, and each attribute has its own tree of multi-rank perks. The deeper perks are gated by attribute level, so the capstone of a tree may need 15-20 in that attribute before you can buy it. Phantom Liberty adds a separate Relic tree with its own points earned from the expansion story. For full loadout ideas, browse our build guides.
| Resource | How You Earn It | Max Amount | Can You Respec? |
|---|---|---|---|
| Attribute points | 7 to spend at creation + 1 per level | 71 total at level 50 (81 at level 60 with Phantom Liberty) | Yes — but only once per playthrough |
| Perk points | 1 per level, plus ~21 from Perk Shards found in the world | 70 (80 with Phantom Liberty) | Yes — free, any time outside combat |
Street Cred vs. Level: Two Different Progression Bars
You level two bars at once in Night City, and they buy different things. Level is raw experience and drives your power. Street Cred is reputation — it drives access: which jobs fixers offer, what vendors stock, and what you are allowed to buy.
| What | Character Level | Street Cred |
|---|---|---|
| Max | 50 (60 with Phantom Liberty) | 50 |
| Earned from | Almost everything: quests, combat, exploration | Side jobs, gigs, NCPD scanner hustles, takedowns and headshots |
| Unlocks | Attribute and perk points, higher-tier gear and cyberware | New fixer gigs, gated vendor items, vehicle purchases, vendor discounts up to 15% |
Early Money Management
Eddies are tight in Act 1 and the game gives you clear priorities. Cyberware is the best investment in the early game; almost everything else can wait.
- NCPD scanner hustles and fixer gigs are your early income — each pays a few thousand eddies and Watson is full of them.
- Save toward the 21,000 eddies Viktor wants (the Paid in Full side job). There is no rush, but paying it unlocks him as a full ripperdoc vendor — do it before a big chrome shopping trip.
- Since Update 2.0, clothes carry no armor — looks are free via the Wardrobe transmog at clothing vendors and apartments, so never buy clothing for power. Armor comes from cyberware.
- Do not buy weapons in the first hours. Loot drops and iconic weapons keep pace, and your eddies are worth far more as chrome.
- Vehicles are a luxury — several cars and bikes come free from quests, so check the car list before spending big.
Fixers & the Four Kinds of Map Jobs
Night City work comes in four flavors, and knowing which is which keeps your journal — and your income — organized. Fixers are the middlemen who hand out gigs: each district has one, Regina Jones runs Watson and is your first and best customer, and Phantom Liberty's Dogtown belongs to Mr. Hands. Finish every gig a fixer offers in their district and they add a bonus reward on top of the per-job pay.
| Job Type | Who Gives It | What It Is |
|---|---|---|
| Side Jobs | Story events and phone calls | Story-driven side quests — romances, character arcs, ending setup. The heart of the game. |
| Gigs | The district's fixer | Short contracts: thefts, rescues, hits, sabotage. Pay out eddies and Street Cred. |
| NCPD Scanner Hustles | The NCPD (blue map icons) | Assaults in Progress, Reported Crimes and Organized Crime sites — grab-and-go combat encounters. |
| Cyberpsycho Sightings | Regina Jones | 17 mini-boss hunts against heavily chromed lunatics, tracked through her Psycho Killer job. |
Your First Ripperdoc Visit: Priorities & Cyberware Capacity
After 2.0, every ripperdoc stocks the same inventory and cyberware tiers scale with your level, so location does not matter — priority does. One number rules the screen: Cyberware Capacity. Every implant costs capacity, and it grows slowly (+3 per level, plus more from Technical Ability), so spend it deliberately.
- Operating System (around level 10) — your single biggest power spike. Cyberdeck for quickhacks, Sandevistan for blades and gunplay, Berserk for tanky brawlers.
- Circulatory System — Blood Pump for an active heal early; Second Heart for a free revive once capacity allows.
- Nervous System — Kerenzikov slows time when you aim while dodging; cheap and excellent for gunfights.
- Legs — Reinforced Tendons (double jump) or Fortified Ankles (charged high jump). Pure mobility that the level design rewards constantly.
- Eyes and Frontal Cortex — anything beyond Viktor's free Kiroshi Optics can wait until capacity is spare.
Crafting in Update 2.0: Specs, Components & Iconic Upgrades
Update 2.0 streamlined crafting into a lean system every build can use — it is no longer gated behind Technical Ability.
- Only weapons, quickhacks and mods can be crafted; armor is purely cyberware now.
- You need a crafting spec (schematic) before you can build an item — buy them from weapon and netrunner vendors.
- Components come in tiers 1-5 and come from dismantling loot. Vendors no longer sell components, so dismantle the gear you were going to toss anyway.
- Mods are crafted by combining two mods of the tier below.
- Only Iconic weapons can be upgraded — each upgrade raises the weapon one tier and costs same-tier components. Crafted weapons cannot be upgraded at all, so craft at the tier you actually need.
Difficulty Settings: Which to Pick
There are four difficulties — Easy, Normal, Hard, Very Hard — and the choice only changes how much damage you and your enemies deal and take. It does not change XP, loot or story outcomes, and no trophy requires a specific difficulty.
| Difficulty | Best For |
|---|---|
| Easy | Story-first players and anyone new to shooters or RPGs |
| Normal | The default — balanced combat while you learn the systems |
| Hard | Players who want cover, quickhacks and build synergy to actually matter |
| Very Hard | Veterans on a later playthrough — enemies hit hard and forgive nothing |
Act 1 Missables: One-Time Items & Choices
Act 1 ends with The Heist, and a handful of items and choices do not come back around on their own. One minute of planning saves a reload later.
- Konpeki Plaza is effectively a one-time story visit: the Satori katana sits on the AV landing pad on the roof, the Kongou pistol is in Yorinobu's bedroom, the Nehan knife is looted from Saburo Arasaka's body in the penthouse, and the Iguana Egg in the penthouse hatches into a pet in V's apartment.
- In The Pickup, how you handle Meredith Stout and the Militech credchip decides who walks away and whether her later side job appears at all.
- During The Heist, your choice about Jackie's body changes how the memorial quest Heroes plays out in Act 2.
- With Phantom Liberty installed, the Dogtown Black Market sells some base-game iconic weapons you missed — a partial safety net, not a full one.
Romance Is Decided at Character Creation
The four full romances are gated by the body type and voice you pick when creating V, and the game never warns you at the time. Judy and River date female Vs; Panam and Kerry date male Vs — and Judy and Kerry also check your voice tone. If a romance matters to your playthrough, decide before you leave the character creator. Get to know the cast first in the character compendium.
| Romance | Requirement | Where You Meet |
|---|---|---|
| Judy Alvarez | Feminine body + feminine voice | Act 1 main story (The Information) — the braindance technician |
| Panam Palmer | Masculine body (any voice) | Act 2 main story — a nomad introduced while hunting Hellman |
| River Ward | Feminine body (any voice) | Act 2 side job I Fought the Law — an NCPD detective |
| Kerry Eurodyne | Masculine body + masculine voice | Johnny's Samurai side jobs in Act 2-3 |
First 10 Hours Checklist
A rough roadmap from character creation to a powered-up Act 2 V. Treat it as a spine, not a cage — side content is the heart of the game.
- Finish the prologue and The Ripperdoc — take Viktor's free optics and hand cyberware.
- Clear Watson: gigs for Regina, NCPD scanner hustles, and every fast travel dataterm you walk past (the Night City map shows what is left).
- Reach level 8-10, then run The Heist — and loot Satori, Kongou and the Iguana Egg in Konpeki Plaza.
- In early Act 2, pay off Viktor's 21,000 eddies and buy your first Operating System at level 10.
- Add legs chrome (double jump) and a heal (Blood Pump or better) as soon as capacity allows.
- Push Street Cred with gigs until vendor stock and discounts improve.
- Around level 15-20, start Phantom Liberty — Dogtown gear and the Relic tree carry you into the endgame.
How Long Is Cyberpunk 2077?
Long enough that planning matters. Player-polled averages put a story-only run at roughly 25-30 hours, story plus side content around 60, and full completion past 100. Phantom Liberty adds roughly 15-20 hours of story, closer to 30 if you clear all of Dogtown.
| Playstyle | Approximate Time |
|---|---|
| Main story only | 25-30 hours |
| Main story + side content | Around 60 hours |
| Completionist (every gig, hustle and ending) | 100+ hours |
| Phantom Liberty expansion | 15-20 hours story, ~30 hours for everything |
Common New-Player Mistakes
These cost new players the most health, eddies and time — each one takes seconds to avoid once you know about it.
- Never scanning. The scanner reads enemy weaknesses, and the Ping quickhack marks every hostile through walls — most ambushes become trivial.
- Treating clothes as gear. Post-2.0 clothing is cosmetic; armor lives in cyberware. Dress for style, fight with chrome.
- Spreading points thin. Cheap first perk ranks across five trees feel productive early and leave you weak at level 20 — pick a lane and go deep.
- Dumping eddies into cars and clothes before cyberware. Capacity and a good OS beat every cosmetic purchase.
- Selling or dismantling Iconic weapons. A gold icon means unique — most cannot be re-obtained on that save, so stash them instead.
- Ignoring Technical Ability. It feeds Cyberware Capacity, and capacity is the real power ceiling of the 2.0 build system.
- Fighting fair. Quickhacks, grenades, explosive environment objects and stealth takedowns all stack — combat is a toolbox, not a duel.
The Point of No Return: Endings & What Comes After
The point of no return is the elevator down to Embers during the final main job, Nocturne Op55N1 — the game explicitly warns you before you step in. Once you ride down, everything unfinished stays unfinished until the credits roll. Afterward the game reloads you to just before that elevator, so you can keep playing, mop up what you missed and even watch a different ending.
- Several endings are locked behind questlines that must be finished before entering Embers: the Aldecaldos ending needs Panam's arc through Queen of the Highway, and the hidden (Don't Fear) the Reaper ending needs Johnny's side jobs — Tapeworm, Chippin' In and Blistering Love — plus the right answers at the oil fields.
- Attacking Arasaka alone in that hidden ending is brutally hard, and if V falls the credits roll on the spot. Bring your best chrome or drop the difficulty first.
- There is no New Game Plus as of Update 2.3 — CD Projekt RED has said one is not planned, so a second playthrough starts from zero. That is why respec rules matter: perks refund freely, attributes only once.